| |
|
| Home - Tutorials
- Video Settings |
| |
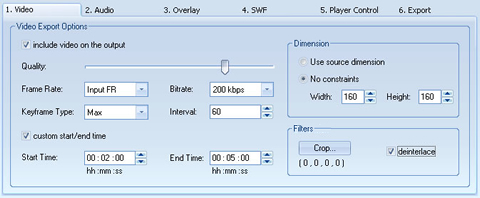
| These are the settings to determine the way your source video is
encoded. |
| |
 |
| |
| Include Video: |
| Check "include video on the output" to include video on
the output Flash. |
| |
| Quality: |
| Encoding quality. By default the quality value is set to 75. Higher
quality value leads to higher quality output and larger file size.
You can specify the quality value from 1 - 100. |
| |
| Frame Rate: |
| Number of frames displayed per second. Higher frame rate, leads
to smoother output and the larger file size. You can enter the frame
rate from 1 - 30. Please note that if your input video was encoded
with 10 frame rate persecond, you will need to set the the output
frame rate as the same. This is important in order to prevent the
output audio out of synch and reduced in quality. There is no frames
limit FLV format can handle, however SWF file format can only support
up to 16 000 frames. Click here
for more info. |
| |
| Keyframe Type: |
| With a Fixed keyframe type, a key frame will be inserted on every n frames. With MAX keyframe type, Snosh will decide where best to put the key frames based on the changes in the image but will force one if it has passed over n frames. |
| |
| Interval: |
| The maximum number of P-frames between I-frames. 0 (Zero) for natural keyframing without any forced keyframes. |
| |
| Bitrate: |
| Ouput bitrate. By default the bitrate value is set to 200 kbps.
Higher bitrate value leads to higher quality output and larger file
size. You can select the bitrate value from 40 kbps - 2000 kbps. |
| |
| Width and Height: |
| The ouput movie size. By default the width and height value will
be the same as the input file width and height. To use custom dimension,
you will need to select No constraints radio button and specify the
custom width and height. |
| |
| Custom Start/End Time: |
| By default the converted Flash length will be the same with the
input file. Custom start/end time is possible with Snosh. Check on
the custom start/end time checkbox and specify the start/end time
as in hh:mm:ss . The custom start/end time will be reseted if invalid
time in entered. |
| |
| Dimension: |
- No Constraints
Use custom dimension
|
- Use source dimension
Use input file dimension
|
| |
| Deinterlace: |
| Deinterlace is used to filter the video frames to improve the quality
of the compressed output. This is useful especially to use on video
capture sources. |
| |
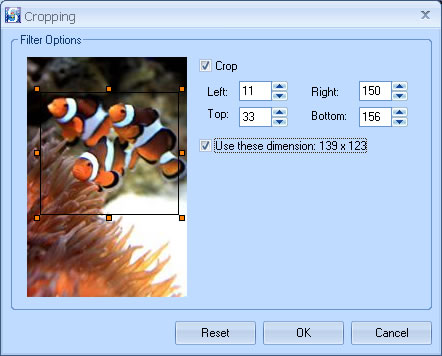
| Cropping: |
| With cropping feature, it allow you to specify portion area of the
video that you want to encode. Cropping is a method for specifying
a region of interest within the video/image and discharging the unwanted
data outside this region. |
| |
 |
| |
| To use the cropping feature, you will need to check the crop checkbox
and specify the left, right, top, and bottom area for cropping. Remember
to check "Use these dimension..." checkbox as well. Click
on OK button to apply the cropping effect. |
| |
| |